Citrix Cloud API Walkthrough
In this tutorial, you’ll learn how to start interacting with Citrix Cloud via its application programming interfaces, or APIs, using your choice of the Python programming language, the PowerShell task automation framework, or the cURL command line tool running in a bash shell.
Prerequisites
A Citrix Cloud account - if you don’t already have one, sign up now.
Prerequisite Tab {.tabnav}
PowerShell
- PowerShell - this tutorial uses PowerShell 7.1. If PowerShell is not installed on your machine, then refer to the Microsoft installation guide to install PowerShell 7.1.
- Basic PowerShell knowledge - this is not a PowerShell tutorial; if you don’t know the basics of PowerShell, then check out the PowerShell 101 tutorial.
Python
- Python - this tutorial uses Python 3. If you do not have Python 3 installed, then download and install the current version on your machine. This tutorial uses Python 3 rather than 2.7 because f-strings make the code more readable when calling REST APIs.
- Basic Python knowledge - this is not a Python tutorial, but there are many excellent tutorials available, whether or not you have existing programming experience. Python For Beginners is a great place to start!
The tutorial uses the Python modules os, pprint, and requests. The first two modules are included with Python. The os module is needed to read and write environment variables. The pprint (short for ‘pretty print’) module is used to format output into a prettier and more readable format.
The requests module is used to make HTTP calls to the Citrix Cloud REST APIs. To install the module, if you have not already done so, use the following PIP command:
pip3 install requests
<!--NeedCopy-->
You can check which modules or packages are installed with the pip3 list command. If you have previously installed the requests module it should be listed in the output. If you try to install the requests module when it is already installed, you’ll see the message, Requirement already satisfied.
cURL
-
cURL - this tutorial uses the
curlcommand-line tool. If you don’t already have thecurlexecutable, thecurlDownload Wizard will help you figure out the best way to obtain it for your platform. -
jq - this tutorial uses the excellent
jqtool to manipulate JSON data. Downloadjqhere. -
Basic knowledge of the
bashcommand line - this tutorial will work withbashon macOS and Linux. It may work withbashon the Windows Subsystem for Linux, but this combination has not been tested.
{}
To understand and compare Python and PowerShell in the context of Citrix Cloud REST APIs, watch the session recording, Clash of the Titans in Automation: Python vs PowerShell, from Citrix Converge 2020.
What is an API?
Wikipedia defines an API as “a computing interface that defines interactions between multiple software intermediaries. It defines the kinds of calls or requests that can be made, how to make them, the data formats that should be used, the conventions to follow, etc.”
APIs allow us to automate repetitive administrative tasks, capture complex configuration as code, and create whole new applications that build on existing services. A working knowledge of APIs and how to leverage them is essential for every modern IT professional.
What is REST?
Representational State Transfer, or REST, is an architectural pattern for designing and implementing APIs. A RESTful API addresses resources via URLs, such as https://api.example.com/user/1234, and typically implements operations via the HTTP protocol. Just as a browser might retrieve a page from a web server via an HTTP GET, then submit data to the server via a form POST, a RESTful API client might use an HTTP GET to retrieve the current state of a resource and then send an HTTP POST to perform some operation on that resource.
RESTful APIs usually, but not always, represent resources using the JSON format. An API client retrieving our example user resource might receive data such as:
{
    "firstName": "Bob",
    "lastName": "Todd",
    "email": "bob@example.com"
}
<!--NeedCopy-->
Create an API client
Before you start coding, you’ll need to use the Citrix Cloud console to configure an API client. The API client comprises an identifier and shared secret that your code can use to access the Citrix Cloud APIs. Follow the instructions to create an API client. Ensure you keep careful note of the client ID, client secret, and customer ID. You will need it in later steps.
Authenticate to Citrix Cloud
It’s a good practice to NEVER put secrets in your code. Set environment variables with the API client and customer credentials:
Set Environment Variables {.tabnav}
PowerShell
At the command line:
set CLIENT_ID=<YOUR_CLIENT_ID>
set CLIENT_SECRET=<YOUR_CLIENT_SECRET>
set CUSTOMER_ID=<YOUR_CUSTOMER_ID>
<!--NeedCopy-->
Python
On Windows, at the command line:
set CLIENT_ID=<YOUR_CLIENT_ID>
set CLIENT_SECRET=<YOUR_CLIENT_SECRET>
set CUSTOMER_ID=<YOUR_CUSTOMER_ID>
<!--NeedCopy-->
On macOS/Linux, at the command line:
export CLIENT_ID="<YOUR_CLIENT_ID>"
export CLIENT_SECRET="<YOUR_CLIENT_SECRET>"
export CUSTOMER_ID="<YOUR_CUSTOMER_ID>"
<!--NeedCopy-->
cURL
At the command line:
export CLIENT_ID="<YOUR_CLIENT_ID>"
export CLIENT_SECRET="<YOUR_CLIENT_SECRET>"
export CUSTOMER_ID="<YOUR_CUSTOMER_ID>"
<!--NeedCopy-->
{}
This tutorial guides you through the APIs interactively. First, open the command prompt of your choice:
Open Prompt {.tabnav}
PowerShell
From the command line, type:
PowerShell
<!--NeedCopy-->
You should see the PowerShell version and prompt:
PowerShell 7.0.3
Copyright (c) Microsoft Corporation. All rights reserved.

https://aka.ms/powershell
Type 'help' to get help.

PS /Users/pat>
<!--NeedCopy-->
Ensure that the PowerShell version is 7 or above.
Python
Start Python with no script argument:
python3
<!--NeedCopy-->
You should see the Python version and prompt:
Python 3.8.6 (default, Oct  8 2020, 14:06:32)
[Clang 12.0.0 (clang-1200.0.32.2)] on darwin
Type "help", "copyright", "credits" or "license" for more information.
>>>
<!--NeedCopy-->
Ensure that the Python version is 3 or above.
Import the following Python modules that you will use:
-
requestsmodule to send HTTP requests -
osmodule to access environment variables -
pprint(‘pretty print’) function to show data more clearly
import requests
import os
from pprint import pprint
<!--NeedCopy-->
cURL
Open a command prompt/terminal, depending on your operating system:
- Windows: From the Start Menu, click Start, type cmd, and then click Command Prompt.
- Mac: Press Command+Space to open Spotlight Search, type terminal.app, and hit Return.
{}
Citrix Cloud uses the OAuth 2.0 client credentials mechanism for authentication. API clients simply exchange their credentials for a short-lived token. The Citrix Cloud trust service’s authentication API has a URL of the form:
https://api.cloud.com/cctrustoauth2/root/tokens/clients

<!--NeedCopy-->
Note:
Use one of the following endpoints based on the geographical region you selected while creating the Citrix Cloud account:
- api.citrixcloud.jp - If your Citrix Cloud account is set to the Japan region.
POST the credentials to the Citrix Cloud OAuth 2.0 token endpoint:
Authenticate {.tabnav}
PowerShell
$tokenUrl = 'https://api.cloud.com/cctrustoauth2/root/tokens/clients'

$response = Invoke-WebRequest $tokenUrl -Method POST -Body @{
  grant_type = "client_credentials"
  client_id = $env:CLIENT_ID
  client_secret = $env:CLIENT_SECRET
}
<!--NeedCopy-->
Examine the $response object to check that the request was successful:
$response
<!--NeedCopy-->
Expected Output:
StatusCode        : 200
StatusDescription : OK
Content           :
                                            {
                                                "token_type": "bearer",
                                                "access_token": "<LONG_STRING_OF_ALPHANUMERICS>
RawContent        : HTTP/1.1 200 OK
                    Cache-Control: no-store
                    Pragma: no-cache
                    X-Cws-TransactionId: 77f8e145-96d6-42d1-ae93-c467d78ef6e8
                    Access-Control-Expose-Headers: X-Cws-TransactionId
                    X-CC-LocalGeo: US
                    X-Content-Type-O…
Headers           : {[Cache-Control, System.String[]], [Pragma, System.String[]], [X-Cws-TransactionId, System.String[]], [Access-Control-Expose-Headers, System.String[]]…}
Images            : {}
InputFields       : {}
Links             : {}
RawContentLength  : 1501
RelationLink      : {}
<!--NeedCopy-->
You should see that the response content is in JSON format, containing a long string of random alphanumerics, among other data.
Note:
Use PowerShell’s
Invoke-WebRequestcmdlet, rather thanInvoke-RestMethod, since the former gives the HTTP status code as well as the content of the response.
You can see the content more clearly if you use ConvertFrom-Json to parse the JSON, and then examine the resulting object with Format-List:
$token = $response.Content | ConvertFrom-Json
$token | Format-List
<!--NeedCopy-->
Expected Output:
token_type   : bearer
access_token : <LONG_STRING_OF_ALPHANUMERICS>
expires_in   : 3600
<!--NeedCopy-->
Python
TOKEN_URL = 'https://api.cloud.com/cctrustoauth2/root/tokens/clients'

response = requests.post(TOKEN_URL, data={
    'grant_type': 'client_credentials',
    'client_id': os.environ['CLIENT_ID'],
    'client_secret': os.environ['CLIENT_SECRET']
})
<!--NeedCopy-->
Examine the response object to check that the request was successful:
response.status_code
<!--NeedCopy-->
Note:
Use one of the following endpoints based on the geographical region you selected while creating the Citrix Cloud account:
- api-ap-s.cloud.com – If your Citrix Cloud account is set to the Asia Pacific South region.
- api-eu.cloud.com – If your Citrix Cloud account is set to the European Union region.
- api-us.cloud.com – If your Citrix Cloud account is set to the United States region.
- api.citrixcloud.jp - If your Citrix Cloud account is set to the Japan region.
Expected Output:
200
<!--NeedCopy-->
response.text
<!--NeedCopy-->
Expected Output:
'\n                        {\n                            "token_type": "bearer",\n                            "access_token": "<LONG_STRING_OF_ALPHANUMERICS>",\n                            "expires_in": "3600"\n                        }\n                        '
<!--NeedCopy-->
You should see that the response is in JSON format, containing a long string of random alphanumerics, among other data. You can see the content more clearly if you have requests parse the JSON, and then examine the resulting Python dictionary:
token = response.json()
pprint(token)
{'access_token': '<LONG_STRING_OF_ALPHANUMERICS>',
 'expires_in': '3600',
 'token_type': 'bearer'}
<!--NeedCopy-->
cURL
token_url="https://api.cloud.com/cctrustoauth2/root/tokens/clients"

curl ${token_url} -d "grant_type=client_credentials&client_id=${CLIENT_ID}&client_secret=${CLIENT_SECRET}"
<!--NeedCopy-->
Expected Output:
{
    "token_type": "bearer",
    "access_token": "<LONG_STRING_OF_ALPHANUMERICS>",
    "expires_in": "3600"
}
<!--NeedCopy-->
Note:
Use one of the following endpoints based on the geographical region you selected while creating the Citrix Cloud account:
- api.citrixcloud.jp - If your Citrix Cloud account is set to the Japan region.
You can combine the curl command with the jq command-line tool to capture access_token into another environment variable to use later. Note how jq uses the -r option to output the ‘raw’ token, rather than a quoted string.
access_token=$(curl -s ${token_url} -d "grant_type=client_credentials&client_id=${CLIENT_ID}&client_secret=${CLIENT_SECRET}" | jq -r .access_token)
echo ${access_token}
<!--NeedCopy-->
Expected Output:
<LONG_STRING_OF_ALPHANUMERICS>
<!--NeedCopy-->
{}
Now you have a bearer token, which expires in an hour (3600 seconds). You must include the bearer token in each API request.
Note:
As you explore the APIs interactively, you will likely experience the token expiring and API calls start to fail with a
401status code. You will need to repeat the authentication step, and recreate any data that contains the expired token - for example, the PowerShell$headersobject, the Pythonsessionobject, and theAUTHORIZATIONenvironment variable used withcurl.
If any of the API calls return an error, then check the status code and response text and refer to the troubleshooting section at the end of this tutorial.
Calling Citrix Cloud Services Platform APIs
Every call to a Citrix Cloud API must include the bearer token in an HTTP Authorization header. Note that, at present, Citrix Cloud does not use the standard OAuth 2.0 header format, in particular, it requires a CwsAuth prefix. CWS stands for Citrix Workspace Services, the original name for Citrix Cloud.
Authorization Header {.tabnav}
PowerShell
Create a headers hashtable with the bearer token you just received.
$headers = @{
  Authorization = "CwsAuth Bearer=$($token.access_token)"
}
<!--NeedCopy-->
Include $headers with each API request you make.
Python
Create a requests Session object, and configure it with an HTTP header containing the bearer token you just received.
session = requests.Session()

session.headers.update({
    'Authorization': f'CwsAuth Bearer={token["access_token"]}'
})
<!--NeedCopy-->
Now you can use the session object to call the APIs, and the authorization header will be sent with each request.
cURL
Create an environment variable for the HTTP header with the bearer token:
authorization="Authorization: CwsAuth Bearer=${ACCESS_TOKEN}"
<!--NeedCopy-->
{}
The Resource Locations API allows you to retrieve the list of configured resource locations.
Use the customer ID to build the correct URL:
Resource Location URL {.tabnav}
PowerShell
$customerId = $env:CUSTOMER_ID
$resourceLocUrl = "https://registry.citrixworkspacesapi.net/$customerId/resourcelocations"
<!--NeedCopy-->
Python
customer_id = os.environ['CUSTOMER_ID']
resource_loc_url = f'https://registry.citrixworkspacesapi.net/{customer_id}/resourcelocations'
<!--NeedCopy-->
cURL
resource_loc_url="https://registry.citrixworkspacesapi.net/${CUSTOMER_ID}/resourcelocations"
<!--NeedCopy-->
{}
Calling the API is a simple HTTP GET on the URL:
Call Resource Location API {.tabnav}
PowerShell
$response = Invoke-WebRequest $resourceLocUrl -Headers $headers
<!--NeedCopy-->
Python
response = session.get(resource_loc_url)
<!--NeedCopy-->
cURL
response=$(curl -s ${resource_loc_url} -H "${authorization}")
<!--NeedCopy-->
{}
Take a look at the return value. You might have any number of resource locations, including zero, depending on your configuration.
Examine Resource Locations Response {.tabnav}
PowerShell
$response | ConvertFrom-Json | ConvertTo-Json -Depth 10
<!--NeedCopy-->
Expected Output:
{
  "items": [
    {
      "id": "9e2fda49-c878-4c23-aae1-8ffcbdc2dab2",
      "name": "My Resource Location",
      "internalOnly": false,
      "timeZone": "GMT Standard Time",
      "readOnly": false
    }
  ]
}
<!--NeedCopy-->
Pass the response through the ConvertFrom-Json and ConvertTo-Json cmdlets as this is the most straightforward way of making JSON data readable. Note that ConvertTo_Json defaults to including only 2 levels of contained objects in the JSON representation. You’ll encounter more deeply nested content in this tutorial, so use the -Depth parameter to ensure that you see all of the data.
Python
pprint(response.json())
<!--NeedCopy-->
Expected Output:
{'items': [{'id': '9e2fda49-c878-4c23-aae1-8ffcbdc2dab2',
            'internalOnly': False,
            'name': 'My Resource Location',
            'readOnly': False,
            'timeZone': 'GMT Standard Time'}]}
<!--NeedCopy-->
cURL
echo ${RESPONSE} | jq .
<!--NeedCopy-->
Expected Output:
{
  "items": [
    {
      "id": "9e2fda49-c878-4c23-aae1-8ffcbdc2dab2",
      "name": "My Resource Location",
      "internalOnly": false,
      "timeZone": "GMT Standard Time",
      "readOnly": false
    }
  ]
}
<!--NeedCopy-->
{}
You can use the Service Entitlement API to get a list of services and the customer’s entitlement to use each one.
Service Entitlement {.tabnav}
PowerShell
$response = Invoke-WebRequest "https://core.citrixworkspacesapi.net/$customerId/serviceStates" `
-Headers $headers
$serviceStates = $response | ConvertFrom-Json
$serviceStates | ConvertTo-Json -Depth 10
<!--NeedCopy-->
Expected Output:
...lots of JSON data...
<!--NeedCopy-->
Python
response = session.get(f'https://core.citrixworkspacesapi.net/{customer_id}/serviceStates')
service_states = response.json()
pprint(service_states)
<!--NeedCopy-->
Expected Output:
...lots of JSON data...
<!--NeedCopy-->
cURL
response=$(curl -s "https://core.citrixworkspacesapi.net/${customer_id}/serviceStates" -H "${authorization}")
echo ${response} | jq .
<!--NeedCopy-->
Expected Output:
...lots of JSON data...
<!--NeedCopy-->
{}
If you’re just interested in the services that are available by default, you can iterate through the list of services, printing only those that have ProductionTrial status. You will see a different list of services.
Service Pipeline {.tabnav}
PowerShell
You can create a pipeline to filter the desired services, and show just the service names:
$serviceStates.items | Where-Object state -eq 'ProductionTrial' | Select-Object -Property serviceName
<!--NeedCopy-->
Expected Output:
serviceName
-----------
cas
itsm
netscalergateway
wem
xendesktop
<!--NeedCopy-->
Python
You can create an array of the names of services with the desired state, and print it with the ‘splat’ (*) operator:
serviceNames = [s["serviceName"] for s in service_states['items'] if s["state"] == 'ProductionTrial']
print(*serviceNames, sep = '\n')
<!--NeedCopy-->
Expected Output:
cas
itsm
microapps
netscalergateway
wem
xendesktop
<!--NeedCopy-->
cURL
You can combine jq filters into a pipeline:
echo ${RESPONSE} | jq -r '.items[] | select(.state == "ProductionTrial") | .serviceName'
<!--NeedCopy-->
Expected Output:
cas
itsm
microapps
netscalergateway
wem
xendesktop
<!--NeedCopy-->
{}
The Resource Location and Service Entitlement API calls retrieved data from Citrix Cloud; you can use the Notifications API to send a notificaton to administrators using the console.
Notification Request {.tabnav}
PowerShell
The notification request needs a timestamp and unique identifier, so set a couple of variables:
$createdDate = Get-Date -Format "o"
$eventId = New-Guid
<!--NeedCopy-->
Now you can create a hash table with the required payload. Note that the Powershell dictionary format is quite different to JSON:
$notification = @{
  destinationAdmin = '*'
  component = 'Citrix Cloud'
  createdDate = $createdDate
  eventId = $eventId
  severity = 'Information'
  priority = 'Normal'
  content = @(@{
    languageTag = 'en-US'
    title = 'Dinner Time'
    description = 'Fish and Chips!'
   })
}
<!--NeedCopy-->
Use the ConvertTo-Json cmdlet to JSON encode the data before POSTing it.
$response = Invoke-WebRequest "https://notifications.citrixworkspacesapi.net/$customerId/notifications/items" `
-Method POST `
-Headers $headers `
-Body ($notification | ConvertTo-Json -Depth 10) `
-ContentType "application/json"
<!--NeedCopy-->
Python
The notification request needs a timestamp and unique identifier, so perform the necessary imports and set a couple of variables:
from datetime import datetime, timezone
import uuid

created_date = datetime.now(timezone.utc).astimezone().isoformat()
event_id = str(uuid.uuid4())
<!--NeedCopy-->
Now you can create a Python dictionary with the required payload. Note that the Python dictionary format is similar, but not identical to, JSON:
notification = {
  'destinationAdmin': '*',
  'component': 'Citrix Cloud',
  'createdDate': created_date,
  'eventId': event_id,
  'severity': 'Information',
  'priority': 'Normal',
  'content': [{
      'languageTag': 'en-US',
      'title': 'Dinner Time',
      'description': 'Fish and Chips!'
   }]
}
<!--NeedCopy-->
Pass the notification dictionary using the json parameter to JSON encode the data before POSTing it.
response = session.post(f'https://notifications.citrixworkspacesapi.net/{customer_id}/notifications/items', json=notification)
<!--NeedCopy-->
cURL
The notification request needs a timestamp and unique identifier, so set a couple of variables:
created_date=$(date -u +"%Y-%m-%dT%H:%M:%SZ")
event_id=$(uuidgen)
<!--NeedCopy-->
Now you can create JSON as required:
notification='{
  "destinationAdmin": "*",
  "component": "Citrix Cloud",
  "createdDate": "'${CREATED_DATE}'",
  "eventId": "'${EVENT_ID}'",
  "severity": "Information",
  "priority": "Normal",
  "content": [{
      "languageTag": "en-US",
      "title": "Dinner Time",
      "description": "Fish and Chips!"
   }]
}'
<!--NeedCopy-->
Post the payload to the Notifications API. Note that you have to explicitly specify the Content-Type header, since the default is a form post.
response=$(curl -s https://notifications.citrixworkspacesapi.net/${CUSTOMER_ID}/notifications/items \
  -H "${authorization}" \
  -H "Content-Type: application/json" \
  -d ${notification})
<!--NeedCopy-->
{}
The response contains an acknowledgement that the notification was processed:
Notification Response {.tabnav}
PowerShell
$response.content | ConvertFrom-Json | ConvertTo-Json -Depth 10
<!--NeedCopy-->
Expected Output:
{
  "destinationAdmin": "*",
  "component": "Citrix Cloud",
  "createdDate": "2021-02-09T08:20:17.120808-08:00",
  "categories": null,
  "severity": "Information",
  "eventId": "004e6570-a0d2-4496-bb91-11e731ae457b",
  "priority": "Normal",
  "content": [
    {
      "languageTag": "en-US",
      "title": "Dinner Time",
      "description": "Fish and Chips!",
      "detailUri": null
    }
  ],
  "data": null,
  "externalId": null,
  "suppressEmail": false
}
<!--NeedCopy-->
Python
pprint(response.json())
<!--NeedCopy-->
Expected Output:
{'categories': None,
 'component': 'Citrix Cloud',
 'content': [{'description': 'Fish and Chips!',
              'detailUri': None,
              'languageTag': 'en-US',
              'title': 'Dinner Time'}],
 'createdDate': '2021-01-20T21:10:45.714095+00:00',
 'data': None,
 'destinationAdmin': '*',
 'eventId': '9f8a18c6-9955-4f8c-8078-76b41a762c00',
 'externalId': None,
 'priority': 'Normal',
 'severity': 'Information',
 'suppressEmail': False}
<!--NeedCopy-->
cURL
echo ${response} | jq .
<!--NeedCopy-->
Expected Output:
{
  "destinationAdmin": "*",
  "component": "Citrix Cloud",
  "createdDate": "2021-02-09T17:52:40Z",
  "categories": null,
  "severity": "Information",
  "eventId": "392768A6-C531-474D-ABA9-BCC550A5E1AC",
  "priority": "Normal",
  "content": [
    {
      "languageTag": "en-US",
      "title": "Dinner Time",
      "description": "Fish and Chips!",
      "detailUri": null
    }
  ],
  "data": null,
  "externalId": null,
  "suppressEmail": false
}
<!--NeedCopy-->
{}
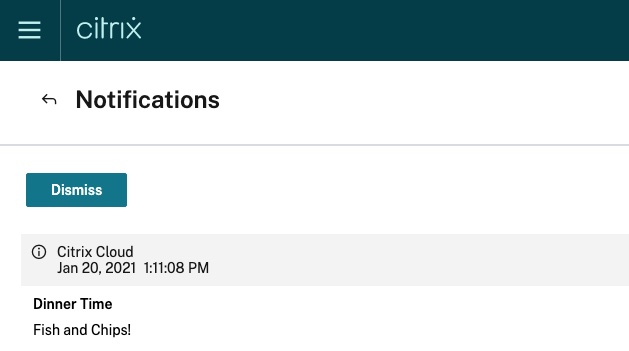
Go to the Citrix Cloud console and click the bell icon, top right, to see a summary of the notification:
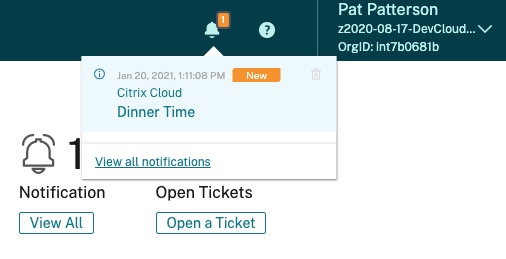
Click the notification title to view its detail:
Calling the Citrix DaaS REST APIs
The scope of the authentication token is not limited to the Citrix Cloud Services Platform APIs; you can use the same token to call other services. For example, the Citrix DaaS (formerly Citrix Virtual Apps and Desktops service) REST APIs allows you to automate the administration of resources within a Virtual Apps and Desktops site.
Note that Citrix Virtual Apps and Desktops must be available in your Citrix Cloud services to complete this section:
If you do not have access to Citrix Virtual Apps and Desktops in Citrix Cloud, then click the Request Demo button, and fill out the form.
The Citrix DaaS REST APIs expect the customer ID as an HTTP header, and also require the Accept HTTP header to have a value of application/json.
Session Headers {.tabnav}
PowerShell
Update the headers accordingly. Note that quotes are required around Citrix-CustomerId, since it contains a hyphen:
$headers += @{
  'Citrix-CustomerId' = $customerId
  Accept = 'application/json'
}
<!--NeedCopy-->
Python
Update the session headers accordingly:
session.headers.update({
    'Citrix-CustomerId': customer_id,
    'Accept': 'application/json'
})
<!--NeedCopy-->
cURL
Set more variables for the required headers:
citrix_customer_id="Citrix-CustomerId: ${CUSTOMER_ID}"
accept="Accept: application/json"
<!--NeedCopy-->
{}
For example, you can use the Me_GetMe API to get details about the currently logged-in admin:
GetMe {.tabnav}
PowerShell
$response = Invoke-WebRequest "https://api-us.cloud.com/cvadapis/me" `
-Headers $headers
$response | ConvertFrom-Json | ConvertTo-Json -Depth 10
<!--NeedCopy-->
Expected Output:
{
  "UserId": "f9f39ab2-7adf-44b5-b9c7-d1e1ad0079bc",
  "DisplayName": "Pat Patterson",
  "ExpiryTime": "6:50:19 PM",
  "RefreshExpirationTime": "5:50:19 AM",
  "VerifiedEmail": "pat.patterson@citrix.com",
  "Customers": [
    {
      "Id": "dvinta7755b1",
      "Name": null,
      "Sites": [
        {
          "Id": "70360961-e0f1-4ce9-9371-d590efb5c04f",
          "Name": "cloudxdsite"
        }
      ]
    }
  ]
}
<!--NeedCopy-->
Python
response = session.get('https://api-us.cloud.com/cvadapis/me')
pprint(response.json())
<!--NeedCopy-->
Expected Output:
{'Customers': [{'Id': 'dvint7b0681b',
                'Name': None,
                'Sites': [{'Id': 'd503b55f-5385-47f9-9849-b586e73cf72b',
                           'Name': 'cloudxdsite'}]}],
 'DisplayName': 'Pat Patterson',
 'ExpiryTime': '9:35:18 PM',
 'RefreshExpirationTime': '8:35:18 AM',
 'UserId': 'f9f39ab2-7adf-44b5-b9c7-d1e1ad0079bc',
 'VerifiedEmail': 'redacted@citrix.com'}
<!--NeedCopy-->
cURL
response=$(curl -s https://api-us.cloud.com/cvadapis/me \
  -H ${authorization} \
  -H ${citrix_customer_id} \
  -H ${accept})
echo ${response} | jq .
<!--NeedCopy-->
Expected Output:
{
  "UserId": "f9f39ab2-7adf-44b5-b9c7-d1e1ad0079bc",
  "DisplayName": "Pat Patterson",
  "ExpiryTime": "6:50:19 PM",
  "RefreshExpirationTime": "5:50:19 AM",
  "VerifiedEmail": "pat.patterson@citrix.com",
  "Customers": [
    {
      "Id": "dvinta7755b1",
      "Name": null,
      "Sites": [
        {
          "Id": "70360961-e0f1-4ce9-9371-d590efb5c04f",
          "Name": "cloudxdsite"
        }
      ]
    }
  ]
}
<!--NeedCopy-->
{}
Creating a Script
In this tutorial, you’ve explored the Citrix Cloud REST APIs interactively. You can put the knowledge you’ve gained to work by writing a simple script to reboot all machines in a given catalog that have no user sessions:
Reboot Script {.tabnav}
PowerShell
#
# Script to iterate through the machines in a given catalog, rebooting any
# that have zero sessions.
#
# The following environment variables MUST be set before running this script:
#
# CLIENT_ID: the API client id
# CLIENT_SECRET: the API client secret
#

# Command-line parameters
# Note use of the Guid type - invalid GUID's will be automatically rejected
param (
  [Parameter(Mandatory=$true)][string]$customerId,
  [Parameter(Mandatory=$true)][Guid]$siteId,
  [Parameter(Mandatory=$true)][Guid]$catalogId
)

# Use endpoints based on the geographical region you selected while creating the Citrix Cloud account.
# api.citrixcloud.jp – If your Citrix Cloud account is set to the Japan region.
# Use the following endpoint.
$tokenUrl = 'https://api.cloud.com/cctrustoauth2/root/tokens/clients'

# Obtain bearer token from authorization server
$response = Invoke-WebRequest $tokenUrl -Method POST -Body @{
  grant_type = "client_credentials"
  client_id = $env:CLIENT_ID
  client_secret = $env:CLIENT_SECRET
}
$token = $response.Content | ConvertFrom-Json

# Create our headers hash table
$headers = @{
  Authorization = "CwsAuth Bearer=$($token.access_token)"
  'Citrix-CustomerId' = $customerId
  Accept = 'application/json'
}

# Get a list of machines in the specified catalog
$response = Invoke-WebRequest "https://api-us.cloud.com/cvadapis/$siteId/MachineCatalogs/$catalogId/Machines" -Headers $Headers
$machines = $response | convertFrom-Json

foreach ($machine in $machines.Items) {
  if ($machine.SessionCount -eq 0) {
    $status = 'success'
    try {
      # Note - the $ in the URL must be escaped with a ` and the content type must be JSON
      $response = Invoke-WebRequest "https://api-us.cloud.com/cvadapis/$siteId/Machines/$($machine.Id)/`$reboot" `
        -Method POST `
        -Headers $headers `
        -ContentType "application/json"
    } catch [Microsoft.PowerShell.Commands.HttpResponseException] {
      # Catch HTTP errors from the API (400, 500 etc)
      $msg = $_.ErrorDetails.Message | ConvertFrom-Json
      $status = "failure: $($msg.ErrorMessage)"
    } catch {
      # Catch anything else
      $status = "failure: $($_.ErrorDetails.Message)"
    }

    # It's not possible to Write-Output without a new-line in PowerShell, so output the whole line at once
    Write-Output "Requesting reboot for $($machine.Name)... $status"
  } else {
    Write-Output "$($machine.SessionCount) sessions on $($machine.Name) - skipping"
  }
}
<!--NeedCopy-->
Save the preceding script as reboot_idle.ps1, and run it:
.\reboot_idle.ps1 --customerId abcd1024xyz --siteId 12345678-1234-1234-1234-12345678abcd --catalogId 12345678-1234-1234-1234-12345678abcd
<!--NeedCopy-->
2 sessions on DEMOLAB\OSPREY - skipping
Requesting reboot for DEMOLAB\EAGLE... failure: Machine does not support specified power action.
Requesting reboot for DEMOLAB\KESTREL... success
<!--NeedCopy-->
Python
#! /usr/bin/python3
#
# Script to iterate through the machines in a given catalog, rebooting any
# that have zero sessions.
#
# The following environment variables MUST be set before running this script:
#
# CLIENT_ID: the API client id
# CLIENT_SECRET: the API client secret
#

import argparse
import requests
import os
import uuid

# Use endpoints based on the geographical region you selected while creating the Citrix Cloud account.
# api-ap-s.cloud.com – If your Citrix Cloud account is set to the Asia Pacific South region.
# api-eu.cloud.com – If your Citrix Cloud account is set to the European Union region.
# api-us.cloud.com – If your Citrix Cloud account is set to the United States region.
TOKEN_URL = 'https://api.cloud.com/cctrustoauth2/root/tokens/clients'

# Parse id's from the command line
# Note use of the UUID type - invalid UUID's will be automatically rejected
parser = argparse.ArgumentParser()
parser.add_argument("-u", "--customerId", required=True, help="Customer ID")
parser.add_argument("-s", "--siteId", type=uuid.UUID, required=True, help="Site ID")
parser.add_argument("-a", "--catalogId", type=uuid.UUID, required=True, help="Catalog ID")
args = parser.parse_args()

# Obtain bearer token from authorization server
response = requests.post(TOKEN_URL, data={
  'grant_type': 'client_credentials',
  'client_id': os.environ['CLIENT_ID'],
  'client_secret': os.environ['CLIENT_SECRET']
})
response.raise_for_status()
token = response.json()

# Create a session object with the relevant HTTP headers
session = requests.Session()
session.headers.update({
  'Authorization': f'CwsAuth Bearer={token["access_token"]}',
  'Citrix-CustomerId': args.customerId,
  'Accept': 'application/json'
})

# Get a list of machines in the specified catalog
response = session.get(f'https://api-us.cloud.com/cvadapis/{args.siteId}/MachineCatalogs/{args.catalogId}/Machines')
response.raise_for_status()
machines = response.json()

# Loop through the returned machines
for machine in machines['Items']:
  # Are there any sessions on the machine?
  if machine['SessionCount'] == 0:
    # Try to reboot the machine!
    print(f'Requesting reboot for {machine["Name"]}... ', end='', flush=True)
    try:
      response = session.post(f'https://api-us.cloud.com/cvadapis/{args.siteId}/Machines/{machine["Id"]}/$reboot')
      response.raise_for_status()
    except requests.exceptions.HTTPError:
      # Catch HTTP errors from the API (400, 500 etc)
      error = response.json();
      print(f'failure: {error["ErrorMessage"]}')
    except Exception as e:
      # Catch anything else
      print(f'failure: {repr(e)}')
    else:
      print('success')
  else:
    print(f'{machine["SessionCount"]} sessions on {machine["Name"]} - skipping')
<!--NeedCopy-->
Save the preceding script as reboot_idle.py, and run it:
python3 reboot_idle.py --customerId abcd1024xyz --siteId 12345678-1234-1234-1234-12345678abcd --catalogId 12345678-1234-1234-1234-12345678abcd
<!--NeedCopy-->
2 sessions on DEMOLAB\OSPREY - skipping
Requesting reboot for DEMOLAB\EAGLE... failure: Machine does not support specified power action.
Requesting reboot for DEMOLAB\KESTREL... success
<!--NeedCopy-->
Note the use of raise_for_status(). So far, you’ve been exploring the APIs interactively, and examining responses manually, taking appropriate action on encountering an error. With simple scripts, if an API call fails with an HTTP error, you can have it it with an error, rather than just continue to the next instruction. This is exactly what raise_for_status() does; if you set the CLIENT_SECRET to an invalid value and rerun the script, it halts with an exception:
export CLIENT_SECRET="GarbageValue"
python3 reboot_idle.py --customerId abcd1024xyz --siteId 12345678-1234-1234-1234-12345678abcd --catalogId 12345678-1234-1234-1234-12345678abcd
<!--NeedCopy-->
Traceback (most recent call last):
  File "reboot_idle.py", line 37, in <module>
    response.raise_for_status()
  File "/usr/local/lib/python3.8/site-packages/requests/models.py", line 943, in raise_for_status
    raise HTTPError(http_error_msg, response=self)
requests.exceptions.HTTPError: 400 Client Error: Invalid request for url: https://api-us.cloud.com/cctrustoauth2/root/tokens/clients
<!--NeedCopy-->
You can see towards the end of the script how it can catch exceptions, display meaningful error information, and carry on iterating over the list of machines.
cURL
#! /bin/bash
#
# Script to iterate through the machines in a given catalog, rebooting any
# that have zero sessions.
#
# The following environment variables MUST be set before running this script:
#
# CLIENT_ID: the API client id
# CLIENT_SECRET: the API client secret
#

# Parse id's from the command line
while getopts u:s:a: opt
do
    case "${opt}" in
        u) customerId=${OPTARG};;
        s) siteId=${OPTARG};;
        a) catalogId=${OPTARG};;
    esac
done

if [ -z "$customerId" ] || [ -z "$siteId" ] || [ -z "$catalogId" ]; then
   echo "Usage: reboot_idle.sh -u customerId -s siteId -a catalogId"
   exit
fi

# Use endpoints based on the geographical region you selected while creating the Citrix Cloud account.
# api-ap-s.cloud.com – If your Citrix Cloud account is set to the Asia Pacific South region.
# api-eu.cloud.com – If your Citrix Cloud account is set to the European Union region.
# api-us.cloud.com – If your Citrix Cloud account is set to the United States region.
token_url="https://api-us.cloud.com/cctrustoauth2/root/tokens/clients"

# Obtain bearer token from authorization server
response=$(curl -s ${token_url} -d "grant_type=client_credentials&client_id=${CLIENT_ID}&client_secret=${CLIENT_SECRET}")
if [ "$?" -ne 0 ]; then
  # Curl failed
  echo "Authorization failed"
  exit
fi

# The -e option tells jq to exit with an error if there is no access_token
access_token=$(echo ${response} | jq -re .access_token)
if [ "$?" -ne 0 ]; then
  # Can't parse a bearer token out of the response
  echo "Authorization failed: ${response}"
  exit
fi

# Create the required HTTP headers
authorization="Authorization: CwsAuth Bearer=${access_token}"
citrix_customer_id="Citrix-CustomerId: ${customerId}"
accept="Accept: application/json"

# Get a list of machines in the specified catalog
response=$(curl -s "https://api-us.cloud.com/cvadapis/${siteId}/MachineCatalogs/${catalogId}/Machines" \
  -H "${authorization}" \
  -H "${citrix_customer_id}" \
  -H "${accept}")
if [ "$?" -ne 0 ]; then
  # Curl failed
  echo "Failed to get machine catalog"
  exit
fi

# Parse out machines - the -c option tells jq to emit 'compact' output - one JSON object per line
# If there is no Items array, then jq will exit with an error as it tries to iterate over the
# non-existent data
machines=$(echo $response | jq -c '.Items[]' 2>/dev/null)
if [ "$?" -ne 0 ]; then
  # Can't parse a list of machines out of the response - it's likely an error message
  echo "Failed to get machine catalog: $(echo ${response} | jq -c .)"
  exit
fi

# Iterate through machines rebooting them
while IFS= read -r machine; do
  sessions=$(echo $machine | jq -r .SessionCount)
  name=$(echo $machine | jq -r .Name)
  id=$(echo $machine | jq -r .Id)
  if [ "$sessions" == "0" ]; then
    echo -n "Requesting reboot for ${name}... "
    response=$(curl -s "https://api-us.cloud.com/cvadapis/${siteId}/Machines/${id}/\$reboot"  \
      -X POST \
      -H "${authorization}" \
      -H "${citrix_customer_id}" \
      -H "${accept}" \
      -H "Content-Length: 0")
    if [ "$?" -ne 0 ]; then
      # Curl failed
      echo "failed"
    else
      # curl succeeded - look for machine Id in response
      echo ${response} | jq -e .Id &>/dev/null
      if [ "$?" -eq 0 ]; then
        # All is good!
        echo 'success'
      else
        # No Id - show error
        echo "failure: $(echo ${response} | jq -cr .ErrorMessage)"
      fi
    fi
  else
    echo "${sessions} sessions on ${name} - skipping"
  fi
done <<< "$machines"
<!--NeedCopy-->
Save the preceding script as reboot_idle.sh, and run it:
chmod +x .\reboot_idle.sh
.\reboot_idle.sh --customerId abcd1024xyz --siteId 12345678-1234-1234-1234-12345678abcd --catalogId 12345678-1234-1234-1234-12345678abcd
<!--NeedCopy-->
2 sessions on DEMOLAB\OSPREY - skipping
Requesting reboot for DEMOLAB\EAGLE... failure: Machine does not support specified power action.
Requesting reboot for DEMOLAB\KESTREL... success
<!--NeedCopy-->
Note that curl exits with a zero status code, indicating success, even in the case of an HTTP failure status code, such as 400, so take care when interpreting its output. Use the -e option to tell jq to exit with an error if its output is null.
{}
Next Steps
The Citrix DaaS REST APIs learning journey walks you through tasks such as publishing apps and enumerating sessions. We’ll be publishing more learning journeys; let us know at developers@citrix.com which topics you would like to see us cover!
Troubleshooting
Invalid client id or client secret
response = requests.post('https://api-us.cloud.com/cctrustoauth2/root/tokens/clients', data={
    'grant_type': 'client_credentials',
    'client_id': os.environ['CLIENT_ID'],
    'client_secret': os.environ['CLIENT_SECRET']
})
response.status_code
<!--NeedCopy-->
Note:
Use one of the following endpoints based on the geographical region you selected while creating the Citrix Cloud account:
- api-ap-s.cloud.com – If your Citrix Cloud account is set to the Asia Pacific South region.
- api-eu.cloud.com – If your Citrix Cloud account is set to the European Union region.
- api-us.cloud.com – If your Citrix Cloud account is set to the United States region.
- api.citrixcloud.jp - If your Citrix Cloud account is set to the Japan region.
400
<!--NeedCopy-->
pprint(response.json())
<!--NeedCopy-->
{'error': 'invalid_client',
 'error_description': 'Invalid client id or client secret.'}
<!--NeedCopy-->
Check that you have correctly set the environment variables with the client ID and secret:
os.environ['CLIENT_ID']
<!--NeedCopy-->
'<YOUR_CLIENT_ID>'
<!--NeedCopy-->
os.environ['CLIENT_SECRET']
<!--NeedCopy-->
'<YOUR_CLIENT_SECRET>'
<!--NeedCopy-->
Exit Python with quit(), and restart the tutorial, ensuring you set the environment variables correctly.
Content-Type must be set to application/x-www-form-urlencoded
Some OAuth 2.0 client libraries erroneously set a charset parameter in the initial authentication. Override the default HTTP headers to include the correct application/x-www-form-urlencoded value. For example, with Python requests oauthlib:
headers = {
  "Accept": "application/json",
  "Content-Type": "application/x-www-form-urlencoded"
}

token = oauth.fetch_token(token_url='https://api-us.cloud.com/cctrustoauth2/root/tokens/clients',
                          headers=headers,
                          client_id=os.environ['CLIENT_ID'],
                          client_secret=os.environ['CLIENT_SECRET'],
                          include_client_id=True)
<!--NeedCopy-->
Missing or invalid CWSAuth header
Every API call must contain an Authorization HTTP header containing an API token in the format CwsAuth Bearer=<TOKEN_VALUE>.
response.status_code
<!--NeedCopy-->
401
<!--NeedCopy-->
pprint(response.json())
<!--NeedCopy-->
{'Error': {'Message': 'Missing or invalid CWSAuth header.',
           'Type': 'CWSAuthException'}}
<!--NeedCopy-->
Check that you are using a session, rather than the default requests object, and you have updated the session’s headers as described above.
Missing or invalid authentication details
The API token is valid for an hour; if you try to use it after it expires, the API will return a 401 status code with an appropriate message in the body:
response = session.get('https://api-us.cloud.com/cvadapis/me')
response.status_code
<!--NeedCopy-->
401
<!--NeedCopy-->
pprint(response.json())
<!--NeedCopy-->
{'detail': 'Missing or invalid authentication details',
 'parameters': {'reason': 'invalid'},
 'type': 'https://errors-api.cloud.com/common/authentication'}
<!--NeedCopy-->
You will need to reauthenticate and create a new session with the token.
Must accept application/json media type
response.status_code
<!--NeedCopy-->
406
<!--NeedCopy-->
pprint(response.json())
<!--NeedCopy-->
{'detail': 'Must accept application/json media type',
 'parameters': {'contentType': 'application/json'},
 'type': 'https://errors-api.cloud.com/common/notAcceptable'}
<!--NeedCopy-->
The client must set the Accept HTTP header to exactly application/json. Currently, the API does not allow values such as */* or the charset parameter. Update the session object with the Accept header and try again.
Internal server error
response.status_code
<!--NeedCopy-->
500
<!--NeedCopy-->
pprint(response.json())
<!--NeedCopy-->
{'activityId': 'c59d1c1a-0735-4ab7-8520-479ebae3fc1e',
 'message': 'Internal server error',
 'statusCode': 500}
<!--NeedCopy-->
Currently, the Citrix DaaS APIs return status code 500 in response to a missing customer ID. Ensure you update the session object with the Citrix-CustomerId header and try again.