Using example programs
The example programs included with the Virtual Channel SDK are buildable, working virtual channels. Use these examples to:
- Verify that your Virtual Channel SDK is correct by building a known working example program.
- Provide working examples of code that can be modified to suit your requirements.
- Explore the features and functionality provided in the Virtual Channel SDK.
Each of these example programs comprises a client virtual driver and a server application. The server-side application is run from the command line within an ICA session. A single virtual channel comprises an application pair.
The example programs included with the Virtual Channel SDK are:
- Ping: Records the round-trip delay time for a test packet sent over a virtual channel.
- Mix: Demonstrates a mechanism to call functions (for example, to get the time of day) on a remote client.
- Over: Simple asynchronous application that demonstrates how to code an application where the server must receive a response from the client asynchronously, and where the type of packet being sent to the client is different from the type received.
- OXS: The Noughts and Crosses game.
Each example includes a description of the program, packet format, and other necessary information.
Ping
Ping is a simple program that records the round-trip delay time for a test packet sent over a virtual channel. The server sends a packet to the client and the client responds with a packet containing the time it received the original packet from the server. This sequence is repeated a specified number of times, and then the program displays the round-trip time for each ping and the average round-trip delay time.
For this example, there is no significant difference between a BEGIN packet and an END packet. The two types of packets are provided as an example for writing your own virtual channel protocols.
This program demonstrates:
-
How to transfer data synchronously. The sequence of events is:
SrvWrite, ClntRead, ClntWrite, SrvRead} {SrvWrite, ClntRead} {...}.The server waits for the client to reply before sending the next packet.
-
How to read parameter data (in this case, the number of times to send packets to the client) from the Module.ini files.
Packet format
The following packet is exchanged between the client and the server.
typedef struct PING {
    USHORT uSign;     // Signature
    USHORT uType;     // Type, BEGIN or END, from server
    USHORT  uLen;     // Packet length from server
    USHORT uCounter;  // Sequencer
    ULONG ulServerMS; // Server millisecond clock
    ULONG ulClientMS; // Client millisecond clock
} PING, *PPING;
<!--NeedCopy-->
Mix
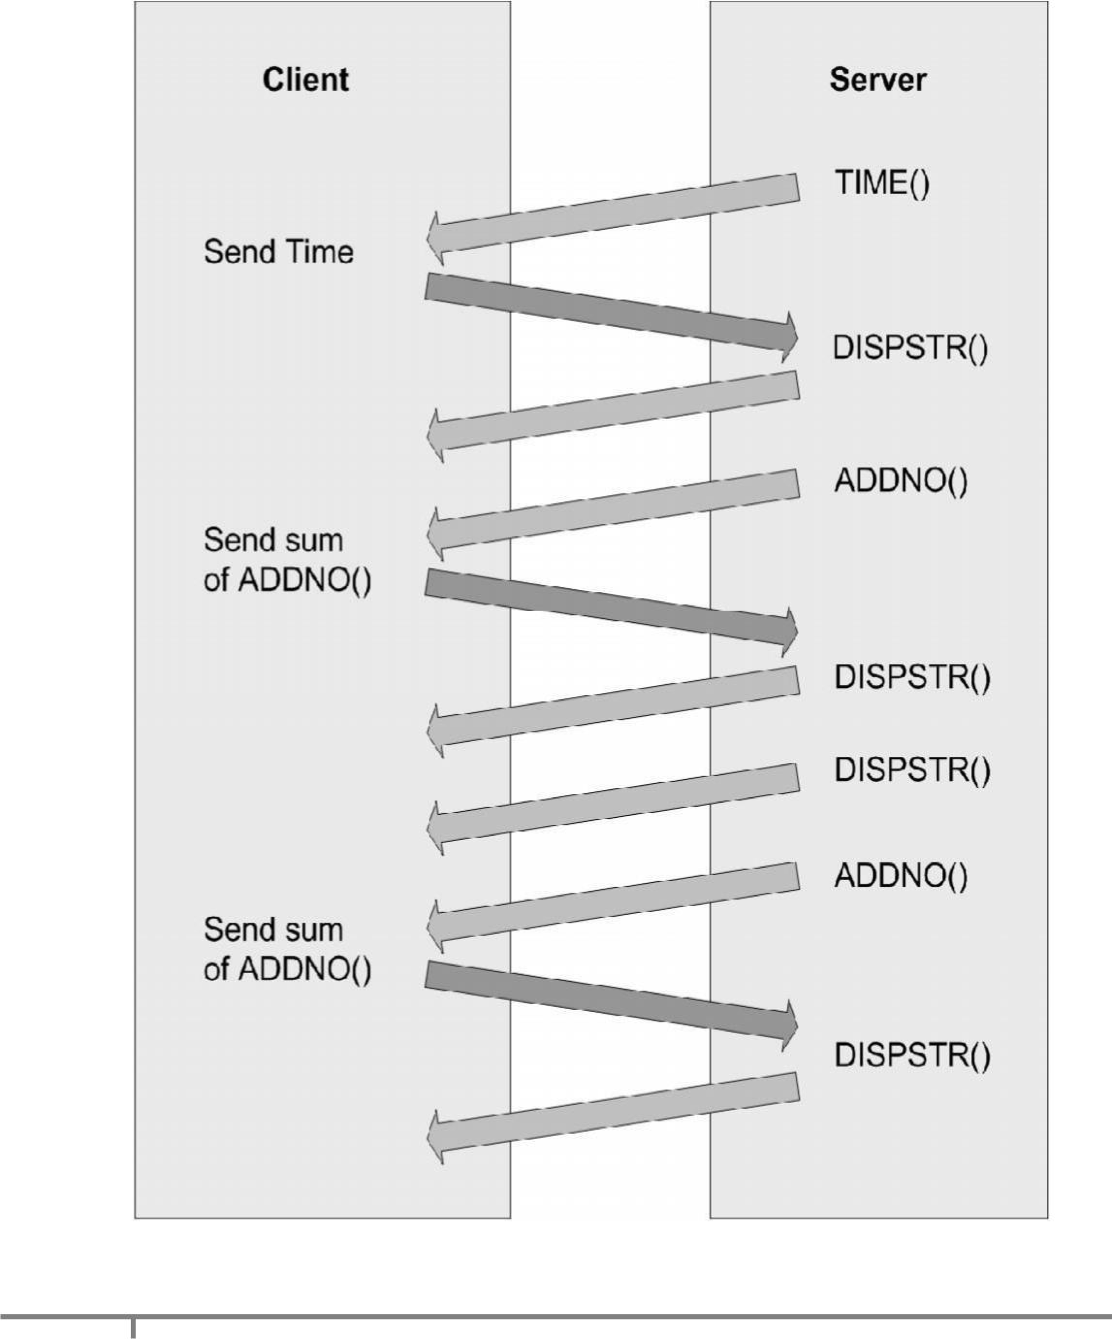
Mix demonstrates a mechanism that can be used to call functions on a remote client (for example to get the time of day). This program demonstrates an extensible scheme for making function calls from the server to the client that allows the server to specify when it expects a response from the client and when it does not. This method can increase performance, because the server does not have to constantly wait for a reply from the client.
The server calls a series of simple functions:
- Add No: Add two numbers and return the sum as the return value.
- Disp Str: Write a string to the log file. There is no return value (write-only function).
- Gettime: Read the client time and return it as the return value.
The actual implementation of these functions is on the client side. The server conditionally waits for the response from the client, depending on the function being executed. For example, the server waits for the result of the AddNo or Gettime function, but not the write-only function DispStr, which returns no result.
Packet format
typedef struct MIXHEAD {
    USHORT uType    // Packet type
    USHORT uFunc;   // Index of Function
    ULONG uLen;     // Length of data
    USHORT fRetReq; // True if return
    ULONG dwRetVal; // Return Value from client
    USHORT dwLen1;  // length of data
    USHORT dwLen2;  // length of data
} MIXHEAD, *PMIXHEAD;
<!--NeedCopy-->
The data consists of the above structure followed by the arguments to the function being called. uLen is the total length of the data being sent, including the arguments. DwLen1 is the length of the data pointed to by a pointer argument.
Sequence of events
This figure illustrates the sequence of events that occurs when you use the Mix program, starting at the top.
Over
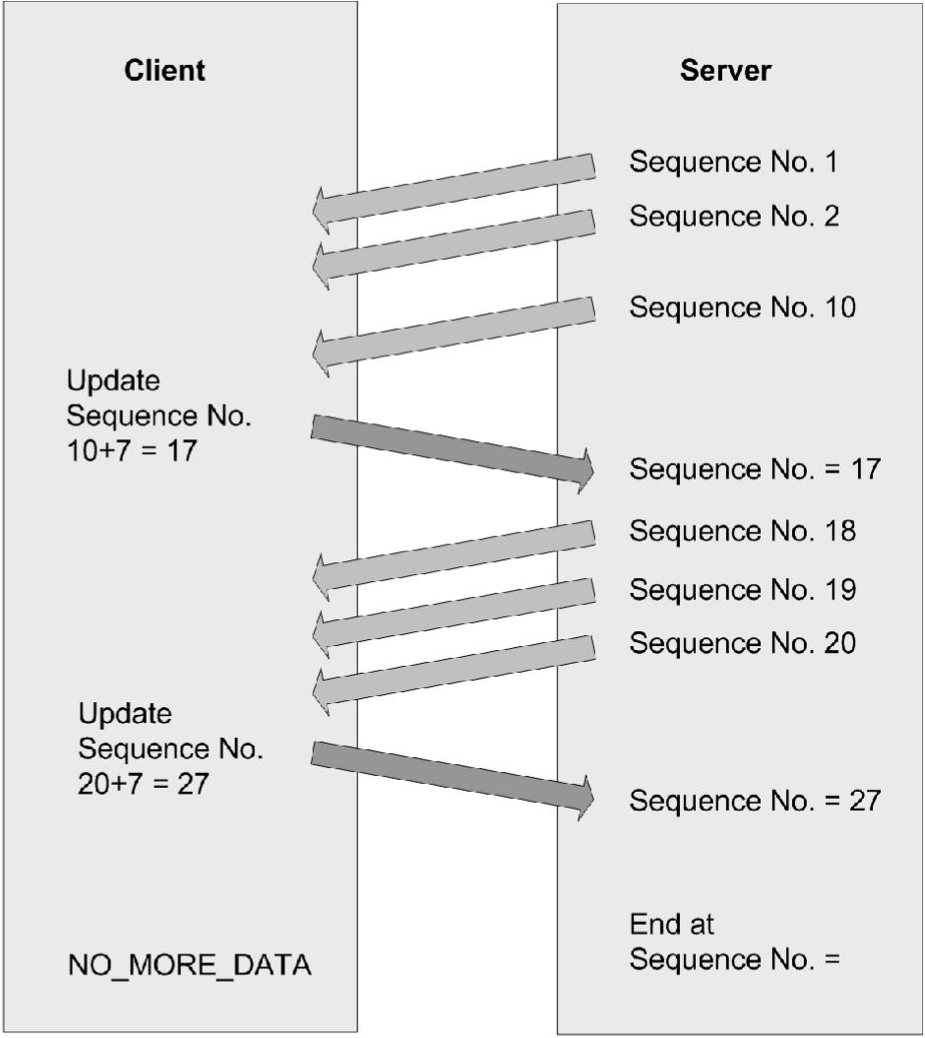
Over is a simple asynchronous application. It demonstrates how to code an application in which the server must receive a response from the client asynchronously, and the type of packet being sent to the client is different from the type received.
When the Over program begins, it:
- Spawns a thread that waits for a response from the client.
- Begins sending data packets with sequence numbers to the client.
- (After sending the last packet of data) sends a packet with a sequence number of NO_MORE_DATA, and then closes the connection.
The client receives packets and inspects the sequence number. For every sequence number divisible by 10, the client increases the sequence number by 7 and sends a response to the server. These numbers are chosen arbitrarily to demonstrate that the client can asynchronously send data to the server at any time.
The packet type used to send data from the server to the client is different from the packet type used to receive data from the client.
Packet format - from server to client
typedef struct OVER {
    USHORT uSign;     // Signature
    USHORT uType;     // Type, BEGIN or END, from server
    USHORT uLen;      // Packet length from server
    USHORT uCounter;  // Sequencer
    ULONG ulServerMS; // Server millisecond clock
} OVER, *POVER;
<!--NeedCopy-->
Packet format - from client to server
typedef struct DRVRESP {
    USHORT uType;    // Type OVERFLOW_JUMP from client
    USHORT uLen;     // Packet length from client
    USHORT uCounter; // Sequencer
} DRVRESP, *PDRVRESP;
<!--NeedCopy-->
Sequence of events
This figure illustrates the sequence of events that occurs when you use the Over program, starting at the top.
OXS
OXS is the Noughts and Crosses game. The OXS virtual channel implements remote drawing of this game. The purpose of this is to demonstrate sub-window or overlay window.
The client component of the OXS virtual driver implements the drawing of the game. All processing of the game play is performed on the server. To achieve client-side drawing, a sub-window (child) of the session window is obtained using the sub-window interface. The sub-window is placed over the corresponding area of the game window, and every movement to the server-side game window is mimicked by the sub-window. This creates the impression of a single application. Mouse clicks and interaction with the server-side OXS application are converted into Play Move, Winning Line, Move Window, and Close Window commands. These are received by the virtual driver and translated into corresponding actions and drawing commands.
This sub-window technology is most useful for solutions such as local video decoding. The sub-window interface is not designed to take keyboard and mouse input. It is intended to render graphics.
Building examples
Building a server-side example using NMAKE
-
Change to the vcsdk\src\examples\vc\server\ subdirectory.
-
At a command prompt, type
NMAKE clean all. -
To build an individual server example, run NMAKE from the example subdirectory.
Building a server-side example using Visual Studio or .NET
-
Create a new Win32 console project. Citrix recommends that the project name is associated with the example (for example, ctxping). You can set the location of the project to the src\examples\vc\server directory so that the .c source files are readily available.
-
Add the following directories to include the search path of the C++ preprocessor in the project settings (where vcsdk is the directory for the Virtual Channel SDK):
- vcsdk\src\examples\vc\shared\inc
- vcsdk\src\shared\inc\Citrix
-
Point to the wfapi include and library paths. Open file wfapi.mak from vcsdk installation path\src\examples\build.
- Set WFAPILIB to the full path of WFAPI lib directory.
The WFAPI SDK installs Wfapi.lib into the designated library directory.