Data Access methods
The following examples show how to export Monitor Service data using the OData API.
Both cloud and on-premises setups are covered.
In the provided examples, authentication prerequisites are assumed to be available (e.g. credentials or bearer tokens). Please look at the Authentication section for details on the authentication methods.
Access using a Browser
-
Place the request URL into a web browser that is running with the appropriate administrative permissions for the XenApp and XenDesktop Site. Citrix recommends using the Chrome browser with a Rest Client add-in.
- For on-premises setups, authenticate using a
usernameandpassword.
For cloud setups authenticate by appending the required headers to the request. See the Authentication paragraph for details. - View the response in a raw XML form.
Access using MS Excel
The steps provided below apply only to on-premises setups. For cloud setups, Power Query is required to implement the required Citrix Cloud authentication.
-
Click the Data tab.
-
Choose “Get Data” > “From Other Sources” > “From OData Feed”.
-
Enter the data feed URL:
http://{MonitorServiceHost}/Citrix/Monitor/OData/v4/Data/{ODataQuery}(or https: if you are using SSL). Replace the placeholder values with the actual host and the OData query. Click Next . -
An authentication window will popup during the first data load. Select Windows and provide the required credentials (
domain\usernameandpassword). Click Connect. -
Select the tables you want to import into Excel and click Next.
-
Transform the fetched data and finally Load it.
Access using MS Excel PowerQuery
Power Query is a data transformation and data preparation engine.
Power Query comes with a graphical interface for getting data from sources and a Power Query Editor for applying transformations. Because the engine is available in many products and services, such as PowerBI and Excel.
Learn from the following example to access the Citrix Monitor Service data using MS Excel PowerQuery. This section only applies to cloud setups.
-
Open Excel (Excel 2016 has PowerQuery inbuilt. If you are using earlier versions of Excel, install PowerQuery. For more information, see Microsoft documentation).
-
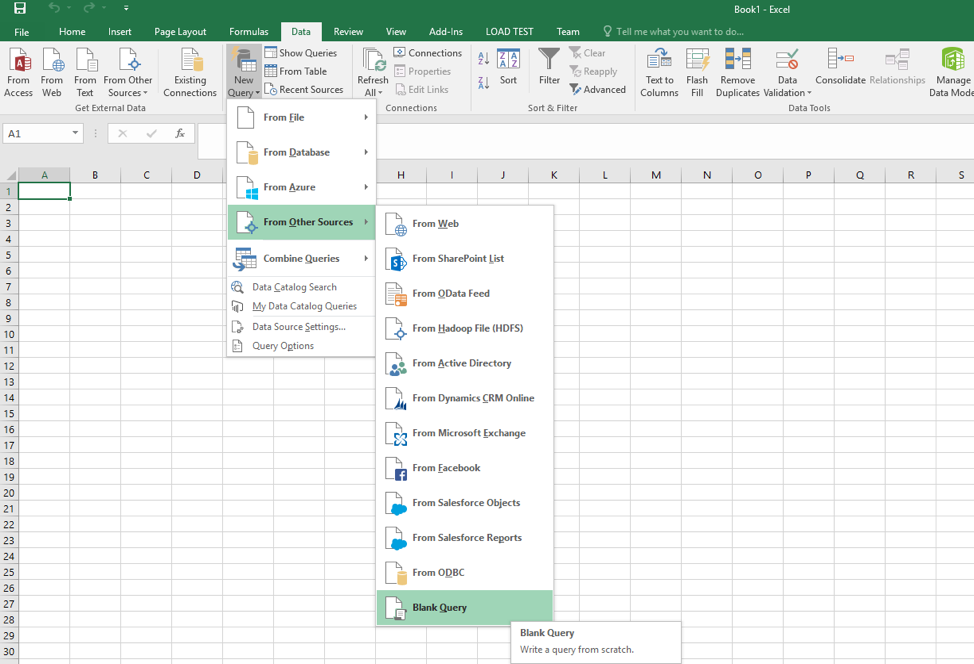
In Excel 2016, go to Data menu > Get & Transform group > New Query > From Other Sources > click Blank Query
-
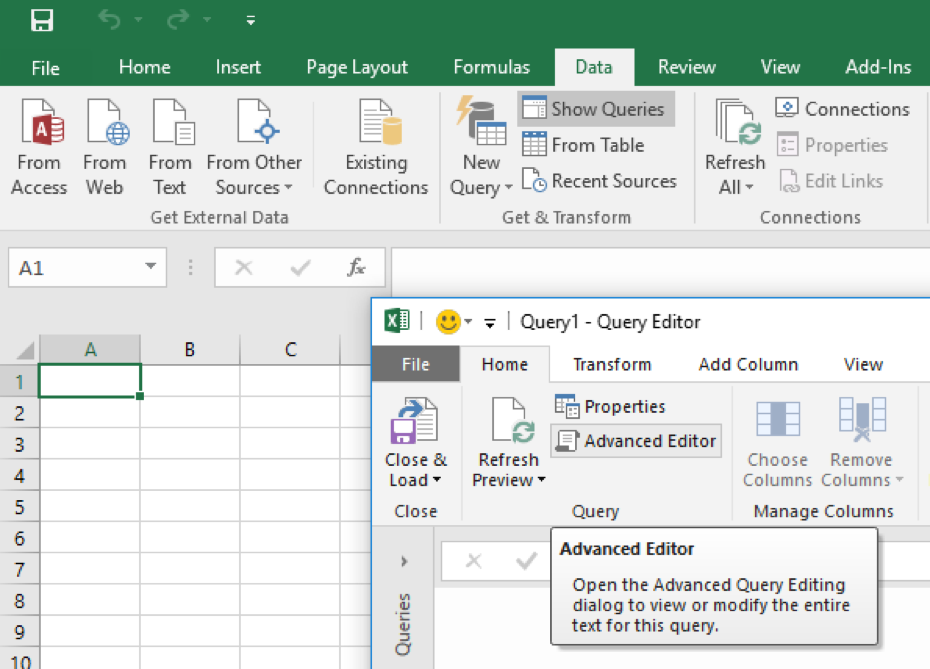
In the Query Editor window, go to Home menu > Query group > click Advanced Editor.
-
In the Advanced Editor window, type the following query:
```js let // Replace the place holder values with your customer and client values customerId = “CUSTOMER_ID_PLACE_HOLDER”, clientId = “CLIENT_ID_PLACE_HOLDER”, clientSecret = “CLIENT_SECRET_PLACE_HOLDER”, // Update the endpoint URL based on your region ccAPIBaseURL = “https://api.cloud.com”, // Replace the sample OData query oDataQuery = “Machines?$filter=LifecycleState eq 0”,
requestURL = ccAPIBaseURL & "/monitorodata/" & oDataQuery, tokenUrl = ccAPIBaseURL & "/cctrustoauth2/root/tokens/clients", // Get Citrix Cloud API credential headers = [ #"customerid" = customerId, #"Content-Type" = "application/x-www-form-urlencoded", #"Accept" = "*/*" ], postData = [ grant_type = "client_credentials", client_id = clientId, client_secret = clientSecret ], response = Json.Document(Web.Contents(tokenUrl, [Headers = headers, Content = Text.ToBinary(Uri.BuildQueryString(postData))])), token = "CwsAuth bearer=" & response[access_token], apiHeaders = [ #"Authorization" = token, #"Citrix-CustomerId" = customerId ], -
In case of first login, a message for specifying how to connect may be displayed. Click Edit Credentials. The Access an OData feed window appears. Make sure that the Anonymous tab and the base URL are selected and click Connect.
-
Upon successful authentication, the results are displayed as a table. In this example, the table lists all the Machines of the customer environment.
Access using LINQPad
This section refers to on-premises setups only.
-
Download and install the latest version of LINQPad from http://www.linqpad.net.
-
Run LINQPad with the appropriate administrative permissions for the XenApp and XenDesktop Site.
Tip: the easiest way is to download, install and run on the Delivery Controller
-
Click the Add connection link.
a. To use the OData v3 endpoint, choose WCF Data Services 5.1 (OData 3) and click Next .
b. To use the OData v4 endpoint the first time, click View More Drivers, search for the OData V4 Driver, click the Download and Enable driver link. This adds the Odata 4 driver to the list of available drivers. Subsequently, you can select OData 4 and click Next.
-
Enter the data feed URL:
http://{MonitorServiceHost}/Citrix/Monitor/OData/v4/Data(or https: if you are using SSL). Select Basic authentication and provide theusername,passwordand (optionally)domain. Click OK. -
You can now run LINQ queries against the data feed and export the data as needed. For example, right-click Catalogs and choose Catalogs.Take(100). This returns the first 100 Catalogs in the database. Choose Export>Export to Excel with formatting.
Access using a Client Library
Currently Citrix Monitor Service supports OData protocol V3 and V4. So, when implementing OData consumers with various programming platforms, please select the correct client libraries.
Access using C#/.NET
The code samples provided in this section demonstrate a way to access Citrix Monitor Service data using C# and more specifically the Simple.OData.Client package.
First, the Simple.OData.V4.Client Nuget Package needs to be installed. Note: If used along with Microsoft.OData.Core, the latter may need to be downgraded to a compatible version.
Sample code for cloud scenario:
using Simple.OData.Client;

namespace ODataClientExample
{
    class Program
    {
        static async Task Main()
        {
            var settings = new ODataClientSettings();
            settings.BaseUri = new Uri("https://api.cloud.com/monitorodata/");
            settings.BeforeRequest += request =>
            {
                request.Headers.Add("Authorization", "CWSAuth bearer=BEARER_TOKEN");
                request.Headers.Add("Citrix-CustomerId", "CUSTOMER_ID");
            };
            var client = new ODataClient(settings);
            var x = ODataDynamic.Expression;
            var machines = await client
                .For(x.Machine)
                .FindEntriesAsync();
            foreach (var machine in machines)
            {
                Console.WriteLine($"MachineID: {machine.Id}, Name: {machine.Name}");
            }
        }
    }
}
The URI can be adjusted to match the customer region. The CUSTOMER_ID should be replaced with the Citrix Cloud Customer ID. Finally, the BEARER_TOKEN can be fetched dynamically using C# code samples available under page Generate Citrix Cloud bearer token.
Sample code for on-premises scenario:
using Simple.OData.Client;
using System.Diagnostics;
using System.Net;

namespace ODataClientExample
{
    class Program
    {
        static async Task Main()
        {
            var credentials = new NetworkCredential("DOMAIN\USERNAME", "PASSWORD");
            var baseUrl = new Uri("MONITOR_SERVICE_HOST/Citrix/Monitor/OData/v4/Data/");
            var settings = new ODataClientSettings(baseUrl, credentials)
            {
                PayloadFormat = ODataPayloadFormat.Json,
                IgnoreResourceNotFoundException = true,
                IgnoreUnmappedProperties = true,
                RenewHttpConnection = true
            };
            var client = new ODataClient(settings);
            var x = ODataDynamic.Expression;
            var machines = await client
                .For(x.Machine)
                .FindEntriesAsync();
            foreach (var machine in machines)
            {
                Console.WriteLine($"Machine ID: {machine.Id}, Name: {machine.Name}");
            }
        }
    }
}
Replace the placeholder credentials (USERNAME and PASSWORD), as well as the MONITOR_SERVICE_HOST value.
References:
- Getting started with Simple.OData.Client
- OData Tutorial with Simple.OData.Client
- Calling an OData Service From a .NET Client (C#)
Access using Java
Calling an OData Service from a Java Client based on Odata4j v0.3 library:
http://www.odata.org/libraries/
http://odata4j.org/v/0.3/javadoc/
Code Fragment:
// create consumer instance
String serviceUrl = "http://{ApiGatewayEndpoint}";
ODataConsumer consumer = ODataConsumer.create(serviceUrl);
// ================General Query================================
Enumerable<String> qEntitySets = consumer.getEntitySets();
System.out.println(qEntitySets.first().toString());

Enumerable<OEntity> qList = consumer.getEntities(qEntitySets.first()).execute();
System.out.println(qList.first().toString());

OEntity qEntity = qList.first();
System.out.println(qEntity.getProperties().get(0));

OProperty<?> qProperty = qEntity.getProperties().get(0);
System.out.println(qProperty.getName());
System.out.println(qProperty.getType());
System.out.println(qProperty.getValue());
// =================Filter Query===========================================
/* GET http://{ApiGatewayEndpoint}/Machines */
String entitySetName = "Machines";
qList = consumer.getEntities(entitySetName).execute();
System.out.println(qList.first().toString());

/* GET http://{ApiGatewayEndpoint}/Machines()?$select=Name, IPAddress */
qList = consumer.getEntities(entitySetName).select("Name,IPAddress").execute();
System.out.println(qList.first().toString());

/* GET http://{ApiGatewayEndpoint}/Machines()?$orderby=Id desc&$skip=40&$top=10 */
qList = consumer.getEntities(entitySetName).orderBy("Id desc").skip(2).top(10).execute();
System.out.println(qList.first().toString());

/* GET http://{ApiGatewayEndpoint}/Machines()?$filter=Name eq '$Name'*/
qList = consumer.getEntities(entitySetName).filter("Name eq 'DOMAIN\\HOSTNAME'").execute();
System.out.println(qList.first().toString());
Access using PowerShell
Learn from the following examples how to access the Citrix Monitor Service data using PowerShell.
Sample OData query for cloud scenario, triggered from PowerShell with the headers initialized and the Raw XML output redirected to a file:
$customerId = "CUSTOMER_ID"
$bearerToken = "CWSAuth bearer=TOKEN"
$apiEndpoint = "https://api.cloud.com/monitorodata"
$query = "$apiEndpoint/Applications"
$headers = @{'Citrix-CustomerId'=$customerId;'Authorization'=$bearerToken}
$results = Invoke-RestMethod $endpoint -Headers $headers -Verbose
\$results | ConvertTo-Json > <Path-to-Output-File>
Please look at section Generate Citrix Cloud bearer token for a PowerShell example for generating a bearer token.
Same query, adjusted for the on-premise scenario:
$userName = 'domain\username'
$userPassword = 'password'
[securestring]$secStringPassword = ConvertTo-SecureString $userPassword -AsPlainText -Force
[pscredential]$credObject = New-Object System.Management.Automation.PSCredential ($userName, $secStringPassword)
$url = "http[s]://{MonitorServiceHost}/Citrix/Monitor/OData/v4/Data/User"
$results = Invoke-WebRequest -Uri $url -Method GET -Credential $credObject
$results.Content > <Path-to-Output-File>
Complete solutions for collecting Monitor Service data using PowerShell scripts can be found under the citrix-data GitHub repository.
Access using any REST API tool
Learn from the following example how to access the Citrix Monitor Service data using any REST API tool, for example Postman Chrome Ext.
Postman is an API platform for building and using APIs. Postman simplifies each step of the API lifecycle and streamlines collaboration, so you can create better APIs, faster.
- Install Postman from Chrome extensions. See https://chrome.google.com/webstore.
- Launch the application.
- Select GET in the dropdown and type in the URL to request.

- Insert headers with your token and customerId. Click Send.
- If authentication is successful, response data is seen in the Response section of Postman.
For accessing on-premise Monitor Service data, use NTLM authentication instead in the Authorization tab and provide username and password.
A Postman collection including several OData examples can be found at Monitor Service OData Postman Collection.
Access using Python script
Learn from the following example to access the Citrix Monitor Service data using Python script with Requests library.
For a cloud environment:
import requests
url = "https://{ApiGatewayEndpoint}/monitorodata/Machines"
payload = {}
headers = {
  'Authorization': 'CWSAuth bearer=BEARER_TOKEN',
  'Citrix-CustomerId': 'CUSTOMER_ID'
}
response = requests.request("GET", url, headers=headers, data=payload)
print(response.text)
Replace CUSTOMER_ID and BEARER_TOKEN with the values of CustomerID and bearer token. An example for generating a bearer token using Python can be found under section Generate Citrix Cloud bearer token.
For an on-premises environment:
import requests
from requests_ntlm import HttpNtlmAuth
url = "http[s]://{MonitorServiceHost}/Citrix/Monitor/OData/v4/Data/Machines"
response = requests.get(url, auth=HttpNtlmAuth('domain\\username','password'))
print(response.text)
Access using curl
Accessing Citrix Monitor Service data is also feasible using command curl.
For a cloud environment:
curl --location 'https://{ApiGatewayEndpoint}/monitorodata/Machines' \
     --header 'Citrix-CustomerId: {YourCustomerId}' \
     --header 'Authorization: CWSAuth bearer={YourToken}' \
     --header 'User-Agent: curl'
For an on-premises environment:
curl --ntlm --user 'domain\username:password' \
     --location 'http[s]://{MonitorServiceHost}/Citrix/Monitor/OData/v4/Data/Machines'
```